Category: Food

After, oh, idono, two years?  I’ve finally updated my noodle site.  I had been wanting to do this for some time.  It’s generally the same, but I adjusted the style a bit (it had been bothering me) and, more importantly, I’ve fleshed out the FAQ section more.  I’ve collected all the questions I’ve gotten so far on the FAQ, and I’ll try to keep it updated as time goes on.

Check out the newness here: http://www.lukerymarz.com/noodles/

I’ve just gotten word from my friend Chef Tomm that he’ll be teaching a Chinese Cuisine class November 21st at the Professional Culinary Institute in Campbell, CA. This will include how to make hand-pulled noodles. Check out the November class schedule at the PCI hobby classes page for more info. I would highly recommend this class regardless of your hand pulled noodle skill level. At the very least you’ll get a hands on session with some primo noodle dough (he makes some awesomely stretchy noodle dough).

You can get yourself a 10% off coupon code if you drop Chef Tomm an email (cheftomm-at-hotmail.com) and mention my name.

Also check out Chef Tomm’s website. He’s got hand pulled noodle recipes and videos there, too.

That’s right. Lye. It’s the traditional way to make soft pretzels, but for liability reasons, cooking shows can’t tell you to use lye (I guess). It’s also kind of a bit of work to get ahold of. But without it, your pretzels will taste like they’re missing something. It also gives them that gorgeous golden color:

The recipe to use is the one from Alton Brown (of Good Eats fame). Instead of using baking soda as he suggests, use 1 oz. of lye crystals to 1 quart of water. I used double that because I had a big pot. Get the mixture to a boil and drop each pretzel in the solution for 30 seconds before you glaze em and bake em.

A couple other things of note I came across while making these:

  1. Don’t forget the melted butter in the dough recipe! I forgot it in my second batch and the pretzels just weren’t the same.
  2. If you love butter (like I do), use it to glaze the pretzels instead of the egg mixture. It’s oh so yummy!
  3. Once you’re done with your lye solution, don’t leave it in the pot! I made the mistake of leaving it in a non-stick pot overnight, and it made the non-stick coating… unstick itself!

Anyways, I gotta give it to Alton Brown. His recipes are always a delight.

I recently made dragon beard candy (view my photos). It turns out it’s a lot easier to make than hand pulled noodles, but the general process for both is the same. The reason dragon beard is easier is because you can really take your time while making it, and it is very forgiving about mistakes.

So I started by watching this video. Then I did a bunch of research on candy making. There are a few things to watch out for:

  1. When heating to a specific temperature, accuracy is very important. A 5 degree (Fahrenheit) difference can change your candy completely.
  2. When cooling your candy, it is in danger of crystallizing. Stirring it or bumping it can cause it to crystallize, so be careful.
  3. You can protect against crystallization by adding vinegar or corn syrup (or both) to your recipe.

Then I experimented a bit with the recipe in the video. I found that:

  1. You don’t need that much water. The goal is to boil it off anyways.
  2. Cooling the sugar to 100 C (212 F) before pouring it is a good way to crystallize your sugar and ruin the batch.
  3. It’s easy to crystallize the recipe anyways. Because of this, I modified it a bit by adding some extra corn syrup.
  4. Finally, the recipe is WAY TOO BIG.

So following all that, the recipe I had the most success with is this:

Dragon Beard Candy

  • 50g Maltose
  • 500g Sugar
  • 250g Water
  • 1/2 tsp White Vinegar
  • 100g Corn Syrup

Combine all the ingredients in a large pot, and boil. Once the temperature reaches 266 F, remove the mixture from the heat. Allow it to cool enough that the bubbles disappear and it becomes transparent. Rather than letting it cool to 212 F and risking crystallization at a low temperature, pour it into small cups immediately. I used little paper Dixie cups, and they didn’t burn or melt. Be careful in your cup choice though, as I used some with a plastic coating that made things a little more difficult.

Pulling the candy is pretty straighforward. Youtube videos are a great help for learning how to do it. Remember to take your time, because the candy CAN break. If it breaks when its still a large diameter, most of the time you can just stick the broken pieces back together by pressing the ends together (sugar is good at sticking to itself). If it’s really thin and you get a few broken strands, don’t worry about it. If you just keep pulling it will work itself back in.

For the peanut mixture, I used peanuts (toasted and ground in a blender or food processor), sesame seeds (to taste), and a little bit of corn syrup to help it stick together nicely. The corn syrup allowed me to get a big pile of peanuts in each dragon beard candy. I like lots of peanuts 😀

Again, here’s a photo gallery of the pulling process. It was really a lot of fun to make, and it was A LOT easier than making hand pulled noodles. So if you’re getting stuck trying to make noodles, take a break and make some candy for a while.

Since there’s been a lot of traffic on my Hand Pulled Noodle Posts, I’ve put together a web page with all the info in one place.  I’m probably going to move on to another project in about a month, so if anyone has an feedback or requests for what should be there, let me know.  After that I’ll be available to answer questions (which I’ll probably put on the AQ page) through email or on my blog posts.

Check out the webpage here.

Stand Mixers

UPDATE February 8, 2009 – I’ve put together a Hand Pulled Noodle webpage with all this info in one place.

I finally did it.  I bought a Kitchen Aid Pro 600 stand mixer.  I got it for a sweet $320 from Bed Bath and Beyond (I finally found a use for the 20% off coupon they keep sending me).  

I recently gave a noodle pulling demo at a nearby culinary school, The Professional Culinary Institute in Campbell, CA.  The folks there had used my dough recipe to get something pullable, but they wanted to see the pulling live.  So I headed over on wednesday.
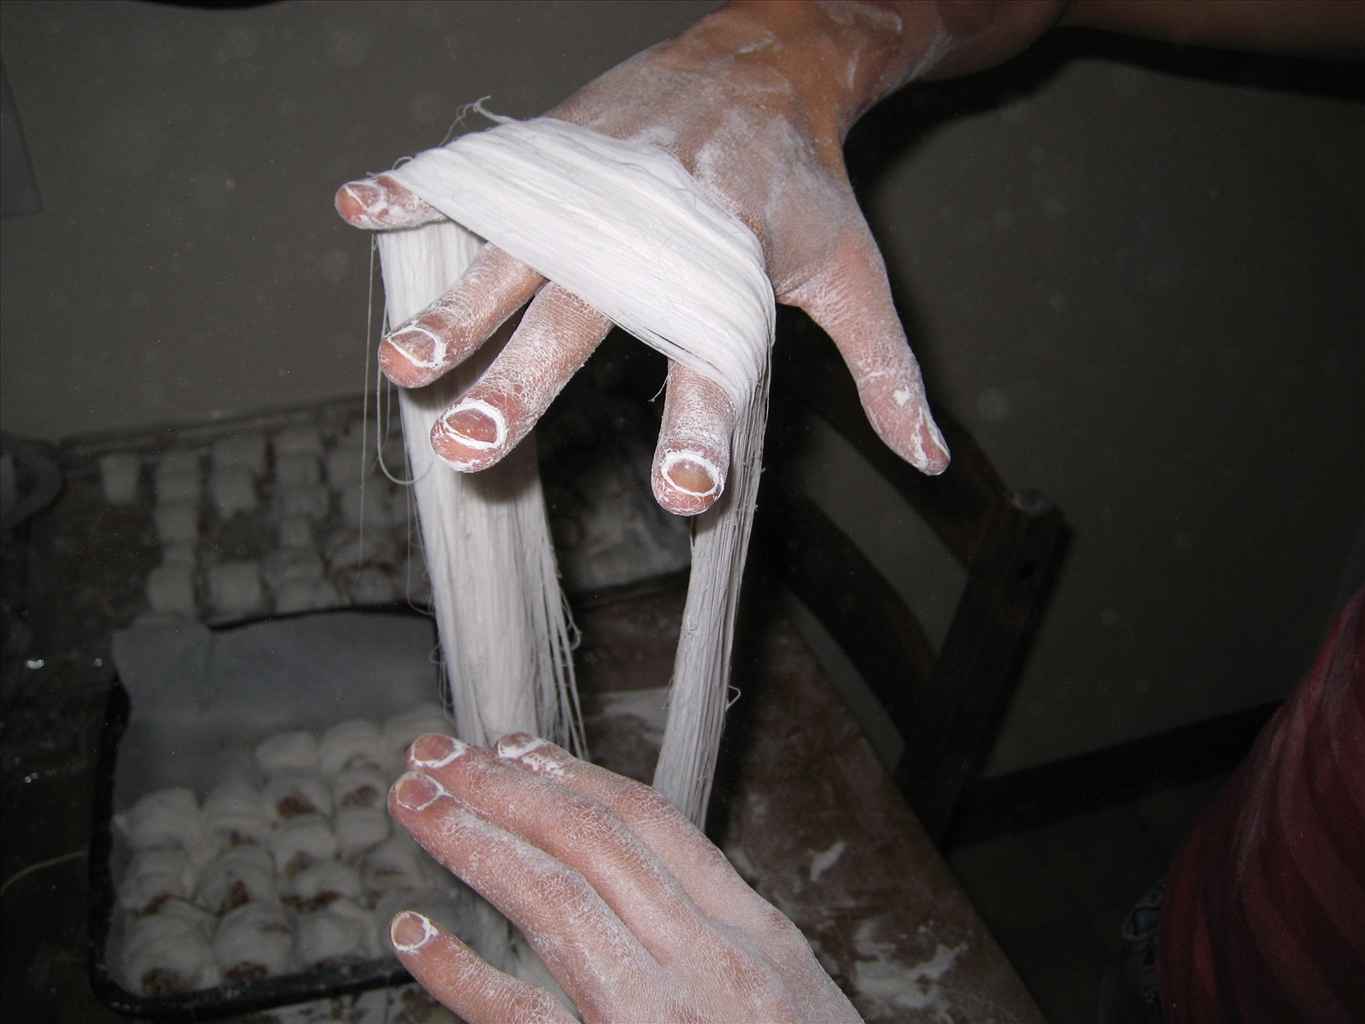
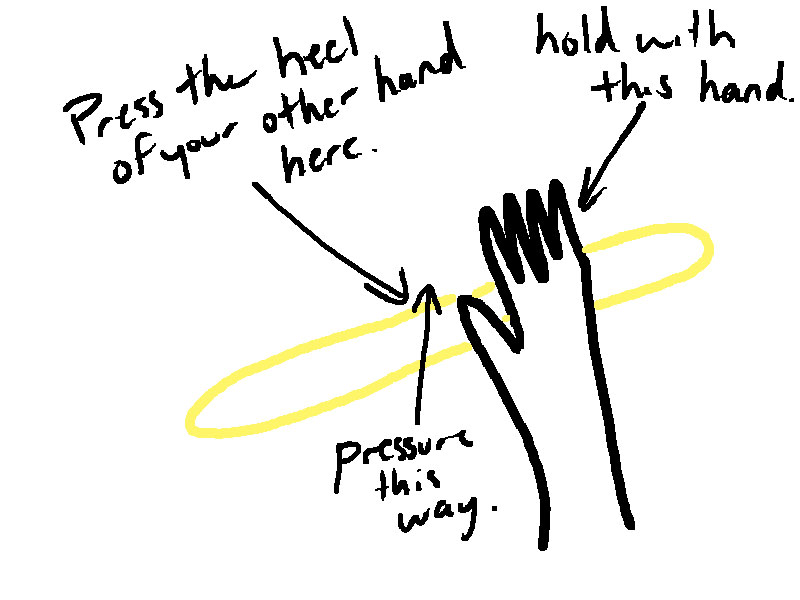
Now up to this point, I had been mixing my noodle dough by hand.  I’m an old-fashioned guy, and doing it by hand has always suited me.  But as anyone who has actually made the dough knows, it takes a lot of work to get it pullable.
So I showed up at the school, and they had already mixed the dough up using their mixer.  I expected dough on the order of what I have at home.  Instead I was surprised with the most stretchy noodle dough I’ve ever played with.  Totally amazing.  With this kind of thing, I can actually see myself pulling a giant wad of noodles instead of the current single/double serving of noodles you can make with my 300g recipe.
So I bought a mixer yesterday, made some dough, and here’s what you need to know:
1.  I quadrupled my noodle dough recipe.  This made a lot of dough, but I’m not sure what you’d end up with running the 300g recipe in a 6 quart bowl.  It just seem like too little.
2.  I put all the dry ingredients in the bowl, turned the mixer on low, and slowly added the liquid ingredients.
3.  While it was running, I added a little extra water.
4.  I ran the mixer on about speed 4 for 10 minutes.  Felt the dough, and then ran it for another 3 or 4 minutes.  After that it was pullable.
5.  I had to use some extra flour at the end to get the dough to a consistency that didn’t stick to my fingers.
The resultant dough was so nice that I was able to show my girlfriend how to make noodles, and she actually made some even ones.  To be fair, she sees me pulling a lot, but it only took her and hour and a half of getting her hands in the dough to end up with something edible.  Pretty good if you ask me.
Anyways, what I’m saying here is if you have a stand mixer, making hand pulled noodles will be a lot easier for you.  If you don’t have a stand mixer, think about it, but try to do it by hand first if you’re going to buy one.  That way you’ll really appreciate the time and work the darned thing saves you.

UPDATE February 8, 2009 – I’ve put together a Hand Pulled Noodle webpage with all this info in one place.

So I went over the translations I got for a post I made about a chinese video I found (special thanks to Rusty), and I came up with another noodle recipe that’s a lot easier than the two previous ones. I did two test batches (the first was too dry, and I botched it with too much baking soda). Here’s what I came up with:

-158g cake flour
-26g regular flour
-110g water
-6g vegetable oil or sesame oil
-2g salt
-1g baking soda
UPDATE 2009-01-29 — I’ve changed this recipe because it was a little dry.  The previous recipe had no oil.

Just combine all the ingredients together in a bowl until it’s pretty well mixed. Then dump it out and knead it til it’s smooth. Give it a short rest (10 minutes), and then the real work starts.
Put a little oil on your hands and knead start working the dough (follow the tips I give in my kneading video). If you knead it without oil, it will seem a little dry, but if you add oil it makes it feel like it could really end up stretching into some nice noodles. You’ll notice a big difference. Try it if you like. You won’t hurt the dough.

Anyways, if you spend some time watching the Chinese video I posted, you’ll notice that the way they knead the dough involves twisting it. I found this to be really useful in giving the dough a little exercise. Basically, roll the dough into about a 10 inch hotdog, hold a section of it in place with one hand, and then press the heel of your other hand into the free part of the dough closest to the part that’s being held. I made an illustration to help out:


I Hope that makes sense.  The goal is to cause a tear in the dough between your hands.  At any rate, I think this recipe is probably the best and easiest to understand. Flour for dough. Salt for flavor. Baking soda for texture. Oil for workability. Good Luck, everyone 🙂

I had the idea to check out google.cn today to see if I could find a lamian recipe.  Well, I found video of a cooking show in which it looks like they explain… everything?  I’m not sure, but there’s information about alkali in there.  I can’t read it, however.  I’ll have to get some translation done.

Here’s some screenshots of particular importance.  I need to call my chinese friends to see who can read it 😀


UPDATE July 19, 2009 – If you live in the San Francisco Bay area, Chef Tomm will be teaching a Chinese food class at the Professional Culinary Institute on November 21st. This will include hand pulled noodles! Check out the November schedule on the PCI hobby classes page. There’s more info (and info on a 10% off coupon) on my blog post here.
UPDATE February 8, 2009 – I’ve put together a Hand Pulled Noodle webpage with all this info in one place.

I’ve made three posts now going through the process of making hand-pulled noodles. Here’s a quick recap:

An image of the final product

Information on ingredients

Recipes and mixing instructions
UPDATE December 6, 2008 –A better and easier recipe

UPDATE January 30, 2009 – Notes about stand mixers

Kneading and pulling technique

I’ll update this posting with any links to posts I make that have more information.

If anyone discovers this and is successful in making noodles, link some photos or make a comment about your success. I’d love to hear about it!

UPDATE June 25, 2008 — I modifed the description of note 1 on the kneading and pulling post. It sounded like you had to throw your dough away after your tried to pull it ONCE. In actuality, you should be able to practice on the same ball of dough repeatedly for upwards of an hour. My point with that note is that the dough acts a little different if you put it in the fridge and try to knead it the next day.

UPDATE July 20, 2008 — I’ve gotten some questions recently about using only all-purpose flour in the dough recipe. Unfortunately, this doesn’t work. I put together a recipe like this in my trials and the result is something the seemingly never loosens up. I spend 45 minutes or so on it and threw it away. Moral of the story, if you want a recipe that uses one type of flour, you’re better of trying to use all cake flour (which loosens up, but a little too much) or picking out a flour from your local asian market. I’ve had great success just randomly picking chinese and korean flours from the shelf at my local market. They all have pretty low gluten levels.

UPDATE October 20, 2008 — I’ve found an interesting video on a chinese website. I need to get it translated, but it’s a cooking show where they make hand pulled noodles. Also, in an effort to figure out a dough recipe that takes a little bit less kneading, I’ve order some gluten relaxers to do some experimenting. If I learn anything, I’ll be sure to post it.

UPDATE December 6, 2008 – I’ve posted a new recipe here. Try it out! It’s a lot easier than the previous two recipes.

UPDATE January 30, 2009 – I’ve posted some notes about stand mixers here, since I’ve finally bought one to experiment with.
UPDATE February 8, 2009 – I’ve put together a Hand Pulled Noodle webpage with all this info in one place.