Archive for the ‘Adobe Air’ Category

MM Ticker Browser 0.2

Wednesday, January 27th, 2010

A while back, I posted a tool for researching stock tickers. Well, after that post I went back into the code and added some functionality for saving preferences. Also around that time, my daily stock watching drifted into just checking the indexes, and that code was forgotten… until today!

I got a request for the source code to MM Ticker Browser, and since my subversion repository no longer has the old code, I figured I’d make an official post about it. I never got around to testing or using the preferences code much, so it may have a couple bugs. That’s why there’s a bug reporting interface in it :D.

So here’s what I’ve posted:

Remember, this in an Adobe Air app, so you’ll need to get Adobe Air.


… and just in case you have problems with this version, you can always use MM Ticker Browser 0.1.

Character Builder 1.3 known issues

Sunday, September 27th, 2009

I’ve gotten a few emails through my issue submission from in the Character Builder, and I thought I’d jot down the current list to keep track of things. I’m not sure when I’ll get to fixing things, but I’ll be sure to post when I do (and the builder will be updated as well). What I’ve got so far are the following problems:

  • Druids begin with three at-will attack powers, but this is not reflected in the builder. For now, you’ll have to put them on your Character Sheet manually.
  • Armor Proficiency (Plate) is missing.
  • Potent Challenge is missing.
  • When manually entering ability scores, you are not given the ability to add stat points if you level up. I may leave this as is, since manual entry was originally intended to be 100% manual.
  • Stats on the final character sheet (PDF) may be incorrect. Make sure you double-check them.
  • On the PDF, it appears that only the 1/2 lvl value is factored into ATT BONUS in the Attack Workspace.
Feel free to post additional issues in the comments section here.

D&D Character Builder Update (1.3)

Friday, August 14th, 2009

Work has been busy these last couple month, but I managed to get my D&D Character Builder updated with the Player’s Handbook 2 races and classes. It might be a little rougher around the edges than previous versions, so I’ve also added a button titled “Got and Issue?” where you can drop me an anonymous email detailing any problems you encounter. Other changes include:

Major Changes
– PHB2 classes and races.
– Submit an issue button. If you find something that ain’t quite right, let me know about it!
– I reworked the skills, feats, and powers page. Make choices on the left, see what you’ve chosen on the right.
– A “to-do” list is available (click the “To-do list” button) that tracks choices you still have to make. If you select on of the listed choices, it will give you more information. If a choice can be made immediately (like for languages), it will give you a little selection box. If not, then you can double-click the choice to have the UI highlight the section you need to make a choice in.

Other Changes
– The code behind the scenes is much more aware of the bonuses you’ve chosen. I spent some time adding code to fill out the character sheet a bit more based on these bonuses. You’ll see modifiers properly applied to your skills based on feats you choose, for example.
– Languages you choose are filled in on the character sheet.
– Changed the name to “builder” instead of “Generator”.
– Powers, feats, and classes are sorted alphabetically now.
– Half-elfs can now choose human feats.
– Added a “license” agreement. This thing is free, but I may as well put it in writing.
– There’s a donate button in the About box now. If you like what you see, your support is appreciated.
– I’ve also added lots more new bugs. Pats on the back to those who find them first.
– If you’d like to use older versions, a link is provided in the Change Log for the version of interest (you can get to the change log from the About box). Previous versions have a “Use this version” link to allow you to go to an older version.

That’s about it. I’d like to sort out a better way to create a character sheet in PDF form, so if anyone has suggestions, drop me a line. XFDF doesn’t seem to be well-supported by Adobe.

Access the new Character Builder (1.3) here.

Web Browser Experiment / Ticker Symbol Power Browser

Monday, June 15th, 2009
I’ve recently been doing a lot of research on stocks. MACD, Bollinger Bands, volume, trend analysis, moving averages, the list goes on. As I’ve been browsing around, I’ve gotten used to one site for one statistic, another for something else, and I’ve ended up with a bunch of sites that TOGETHER give me what I feel is enough information to make a decision about a stock. It’s pretty interesting stuff, but it’s just such a doggone pain to have to open 4 different browser windows just to be able to tell if I’m interested in a stock or not. It takes too long to keep up with, for example, a live chat where people are pointing out ticker symbols to look at.
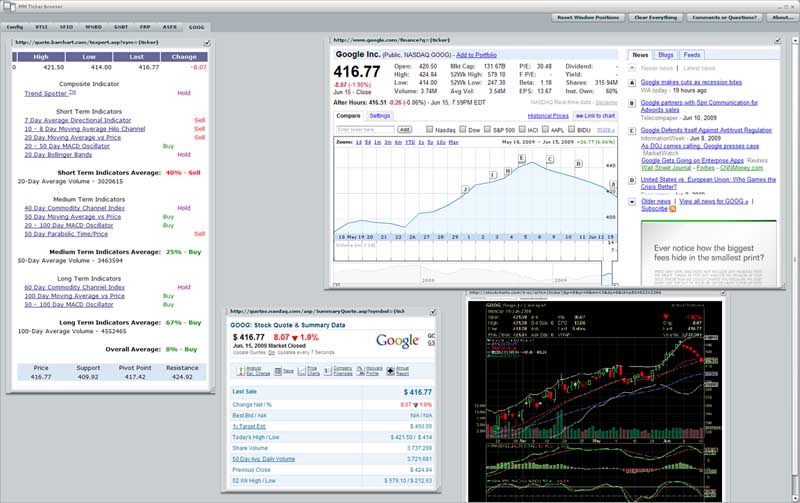
So I was frustrated with this situation last Wednesday and I decided I’d do something about it. What I came up with is this:

It’s a Multi-Tab, Multi-PAGE Ticker Browser. And since I’m not feeling a snazzy name, MM Ticker Browser for shorter, and MMTB for short. It’s more of a tool for myself than anything, but all the people I’ve shown it to think it’s pretty neat, so I thought I’d package it up in the case anyone wanted to use it. Here’s the rundown:
The General Feature List:
  • It is designed to show you multiple web pages in a SINGLE TAB.
  • It shows you multiple tabs in a single window, like we’ve all grown accustomed to.
  • All window positions, sizes, and scroll positions are saved automatically so it all comes back if you need to restart.
  • SCALABLE windows! If that’s chart is too big, scale it down a bit!
  • All windows are resizable and movable. Web pages can hide their scroll bars to save space once you’ve got your scroll position locked in.
  • You can add multiple notes to each page (really useful if you’re trying to sift through a bunch of tickers).
    Now here’s where it gets tricky,
  • A pseudo-templated window layout. Each ticker symbol you enter will get its own tab, in which it will contain all the same websites for the chosen ticker. This is probably better understood in an example. I’ll show you below.
You’ll need:
What to do:
  1. When you first start it up you get a window like this:

  2. This is the config page, where you specify the URLs for the web pages that show you your ticker information. Incidentally, you also specify ticker symbols here. This page is also used as place you can load up web pages that give an overview of the market, and you can even log some notes for yourself to help remember things.

    If you want to remove something from one of these windows, click it with the mouse and press delete. Any tabs or windows associated with it will be deleted.

    • Local Windows: This is where you enter urls for web pages you want shown on the config page. Paste “http://www.google.com/finance” into the text box and press enter. It will add a new window to the config page that loads the google finance main page. You can move it, resize it, and scroll around in it as you need. It’s position, size and scroll position will be saved. try zeroing in on the DOW/S&P/NASDAQ chart in this window. Now click the checkbox in the upper right hand corner. This will remove those pesky scroll bars.
    • Ticker Symbols: This is where you enter the ticker symbols you’re interested in. Each ticker symbols will get its own page of information. Enter “GOOG” in the text box and press enter. Notice the tab that shows up? If you click it now, it won’t have anything on it. That where the Ticker URLs come in.
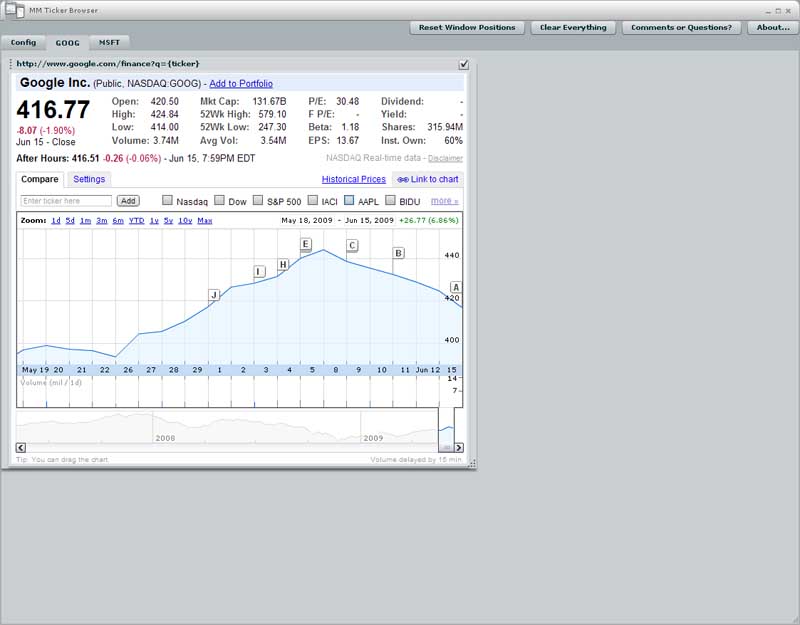
    • Ticker URLs: This is where you enter the URLs of the websites you use for research. In order for it to work, though, you have to let it know where the ticker symbol should be inserted into the url. For example, I can look at the GOOG ticker at “http://www.google.com/finance?q=GOOG“, but this URL will be used for every ticker symbol you enter. So you have to replace every occurrence of the ticker symbol in the URL with “{ticker}”. Enter “http://www.google.com/finance?q={ticker}” in the textbox and press enter. Now click the GOOG tab. A window has been added with the google finance webpage for GOOG!

      If you enter another ticker, say MSFT, into the Ticker Symbols list, it will be given its own tab, and it will load up the google finance ticker page for MSFT.

    • You should have something like this now:


  3. Here’s the cool part. On the GOOG tab, resize the google finance window. Now go to the MSFT tab. Your changes are replicated here, and on any other ticker tabs you might have. You’re essentially live-editing a window layout that is applied to each ticker tab.
  4. Charting web sites are just as easy. On the config page, add “http://stockcharts.com/h-sc/ui?s={ticker}” (note my usage of “{ticker}”)to the Ticker URLs list. A window for this URL is added to both the GOOG and MSFT tab. You can adjust it, move it around, and lock down the location of the chart.

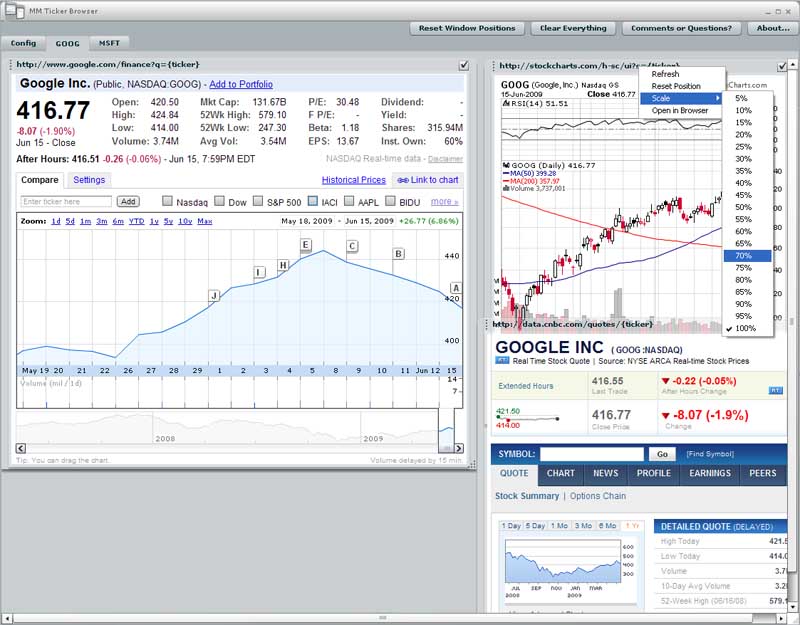
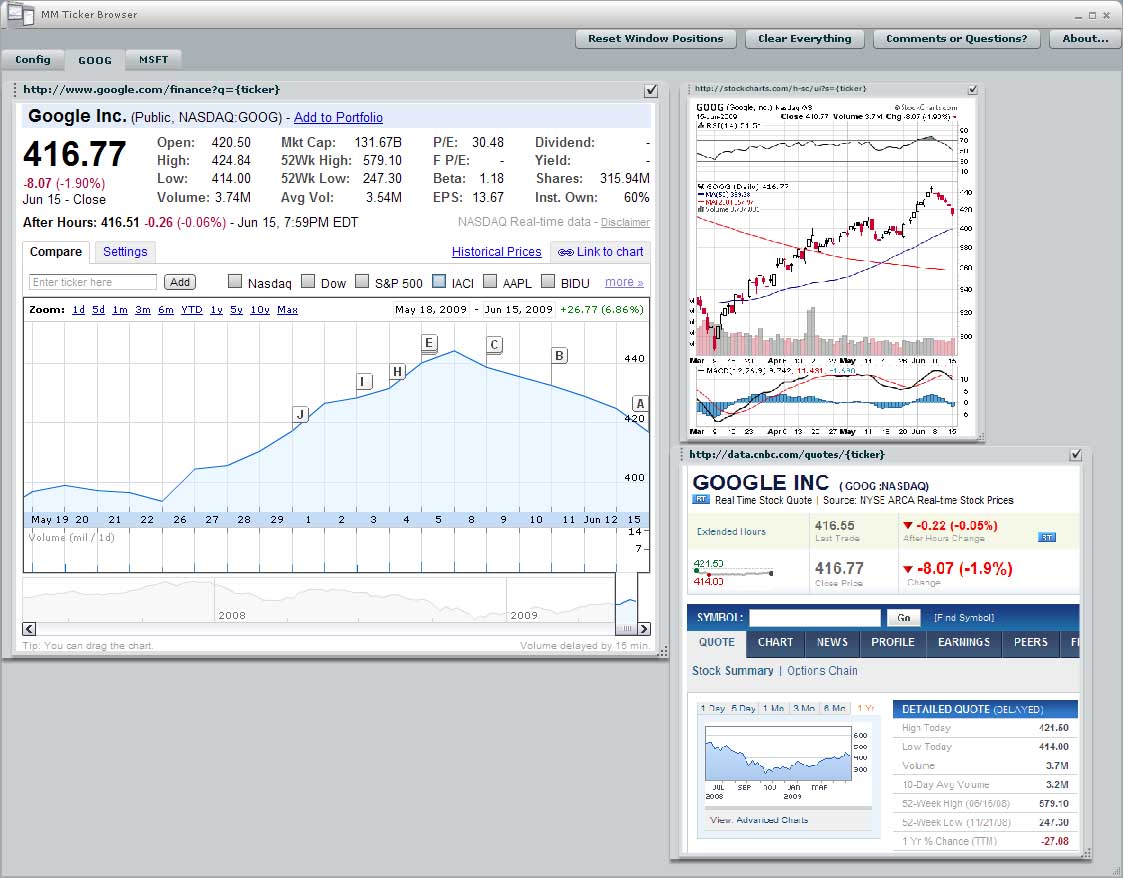
    But suppose you also like the information at CNBC, “http://data.cnbc.com/quotes/{ticker}“? You’re starting to run out of real estate now. You could go get a bigger monitor, OR you could just scale some of the windows down by right clicking the window header, turning this mess:

  5. using a scaling factor:
    into THIS:

  6. And lastly, should you want to jot something down to help yourself remember a chart trend or date or whatever, you can right click in the background of any tab and click “Add Note Window”. This will plop a note window under your mouse where you can write some text for later. Note windows are note replicated across tabs, so you can add specific notes for each ticker. Add some notes to your config tab, too. I like to track a list of ticker symbols I’ve look at and decided I don’t like.
That the general usage. You’ll also notice some other options on right click menu where you found the scale option
  • Refresh – Just in case you need to do a hard refresh.
  • Reset Position – This move the window back to its original position. If you accidently drag the header off of the page, you can right click the border of a window to show the right click menu, choose this option, and recover your window.
  • Open in Browser – Loads the URL being displayed into a REAL browser. For those time when you just want to go back to a normal web page.
And there are some button in the top right of the main window.
  • Reset Window Positions – If you’ve really lost track of your windows, this will move them all back to the original position. Don’t click this unless you want to have to reposition everything.
  • Clear Everything – Deletes ALL your preferences. Ticker symbols, URLs, notes, all of it. gone forever. Good if you just want a fresh start.
  • Comments or Questions? – Drop me a line through this dialog. Bugs, comments, questions, anything. When you click submit, it will send an email to my special MM Ticker Browser email. I’ll do my best to reply promptly.
  • About – My general about box. There’s also a change log in here, but it’s mostly empty. I’ve used this dialog in another app, and with flash, I can link back to previous versions if you need them. Look for those here if I make and update you hate.
And finally, a few caveats:
  • This is thought experiment turned tool turned thought experiment (yes, I meant to say that) on my part. There is most likely a bit of instability on account of that fact.
  • I suggest not logging into any extra personal websites with this tool (definitely not your online trading account). I don’t know much about security, but my guess is that the browser windows it shows are less safe than normal internet browsers.
  • Since this is written using Adobe Air (flash), its bound to turn into a memory hog if you give it the chance. I don’t usually have more than about 8 or 10 tickers loaded at any one time. Note that each tab only loads when you click on it, so adding a bunch of ticker symbols on the config page won’t do anything until you start clicking on the tabs.
  • And if you see a crash, don’t panic! It automatically saves your preferences every 15 seconds, so you shouldn’t have lost any work.
And once more, for those who scrolled straight to the bottom:
You’ll need:
Enjoy!

XML schemas, Excel, and getting what you want

Saturday, October 4th, 2008

In my character generator, there is a lot of data.  There’s races, classes, skill, feats, and powers.  On top of that, they’re not static lists.  Wizards of the Coast (and other people) are always adding and expanding on everything.  With that in mind, I knew I needed to have all that data extensible in my character generator.  XML is the obvious choice, especially since Flex is so good at parsing it.

But how was I to get the data in the PHB into XML in the easiest way possible?  Microsoft Excel and XML Schemas is the answer.  The basic idea is that you enter all your data into Microsoft Excel as a big list.  Then you tell Excel to export it as XML.  That XML is then fed into the Flex app.  
XML schemas tell Excel how to format the XML you export.  With an XML schema, you’re defining the basic format of your XML (in XML, ironically).  There’s an article here that gives a good way to create a simple Xml Schema Definition (XSD) using Excel (see step 6, specifically).  That will give you the schema, and then you can attach that to your Excel spreadsheet and have Excel export XML for you.
But there’s a HUGE caveat.  Excel cannot handle (that is, export, import, deal with at all) XML with a list of lists.  This looks something like this:
<feats>
  <feat name=”a”>
    <prerequisites>
      <prerequisite name=”x”/>
      <prerequisite name=”y”/>
    </prerequisites>
  </feat>
  <feat name=”b”>
    <prerequisites>
      <prerequisite name=”p”/>
      <prerequisite name=”q”/>
    </prerequisites>
  </feat>
</feats>
We’ve got a list of feats, each containing a list of prerequisites.  The issue, specifically, is that we have many elements.  Now, if you think about this, it makes sense.  Excel allows you to easily edit a two dimensional array of data.  More than that and it gets complicated.
The solution I went with to get around this (because I require being able to add and remove from various lists of data, and it makes the XML easier to read) is to make use of the really good XML functionality in Flex.  My solution works like this:
1.  enter you data in Excel.  any time you have a list of things, enter them as a single cell and separate each “thing” with a comma.
2.  export to a simple xml format.
3.  feed the xml into a Flex app that takes the XML and converts any comma separated lists to a proper XML list.
A sample of this is here.  My flex app takes a list of feats I exported from Excel (shown on the left side), and then prints the proper XML for me to save to a file (shown on the right side).  There’s now an extra step if I update my Excel spreadsheet, but it’s better than having to edit XML all day long.
Unfortunately, I don’t know of a way to get Flex to do magic things with XML schemas, so the dream app of being able to give one XML format and export another is still off my radar.  Also, you are effectively writing your XML schema in Flex code, so if you need to make a schema change, it’s instead a Flex code change.  This is not necessarily bad.  I feel more comfortable making changes in code instead of in fancy XML schema editors.
Now, I’ve heard that Altova makes a really nice application that can handle lists of lists, but I haven’t tried it (and the price is outside my budget).  Something for next time, I suppose.  For now, I’ve got a “good enough” solution for tricky XML, and it will be easy to update in the future if I need to.
Character Generator update

Sunday, September 21st, 2008

I’ve updated the Character Builder. I added a changelog that tracks the changes I’ve made. It’s accessible from the About box (click the top right button in the app).

I made a fix for the healing surges not showing up, and I fixed a bug that was keeping humans from getting their bonus skill, feat, and power.

bugs in Generator

Friday, September 19th, 2008

There seems to be a bug in the healing surges calculations on the character sheet. I’ll take a look sometime this weekend. I’ll also look at the character sheet and see if I can get, for example, the damage and attack workspaces to show blank instead of Zero so they can be filled in with a pencil.

D&D Character Generator

Wednesday, September 17th, 2008

UPDATE 2009.08.14 – I’ve posted a new build with PHB 2 races and classes, and a handful of new features. See the details here.

UPDATE 2009.04.01 – You will need Flash 10 to run this now. I’ve updated the “view as PDF” functionality so it uses the new Flash 10 feature to create files on the fly. It doesn’t have to ask my server to create the file anymore. Hooray! I’ve also changed the size a bit. See the change log in the about box for more info.

Ok. I’ve FINALLY finished a project I’ve been working on for the last couple months. I’ve been giving it about two 4 hour sessions a week, and [AT LAST!] I’m satisfied enough with it to post it.

It’s a character generator for Dungeons and Dragons 4th edition. I got the books in July when they released the set, and I thought it would be fun to put together a character generator that made it a bit easier to parse the whole thing.

This bad boy is written in Flex, so you can run it from any web browser with Flash 9. The general idea is that you build your character through the flex interface, and when you’re done, click the “View as PDF” button and out pops a nice PDF for you to print out. It DOES NOT replace the Player’s Handbook in any way. It’s more of an easing function on the whole ordeal.

Use the app here. You’ll need Flash 9. Don’t forget that you can drag and drop your stat numbers in the Standard Array and Roll entry types. I haven’t yet figured out a good way to indicate that they’re draggable, as the Flex “useHandCursor” flag doesn’t see to work.

Here’s a list of caveats / known flaws / things that aren’t implemented:

– THIS DOES NOT REPLACE THE PLAYERS HANDBOOK.

– choosing of equipment is not implemented. You’ll need to use the PHB after you print your PDF.

– Half-Elf: after creating the PDF, be sure to choose an at-will power from another class for the dilettante race feature.
– Ranger: After creating the PDF, choose Dungeoneering or Nature as a skill. This will affect your modifier for the skill by 5 points, so don’t forget!
– There appears to be an error in the class listings in the Player’s Handbook. When a skill is automatically given (listed as “free” in my UI), it is also listed as a choice. In my code, I automatically remove the free skills from the choice list.
– I have not implemented languages. choose them on the PDF.
– Human: you get +2 to an ability of your choice. Do this on the PDF.
– The PDF has some fields that automatically fill as Zero. If there are certain ones you think should not be filled at all, let me know and I’ll fix them.
– certain class and race features require you to choose between two things. In cases where this is not implemented, it is listed on the character sheet as a “choose x or y” listing under the class/race features sections.

UI bugs:
– there’s a minor glitch in the positioning of the strength stat when you drag a number on top of it (only seen in the Roll entry type).
– Powers have no descriptions. They’re intended to not have power descriptions, but they’re supposed to say “See Player’s Handbook”.

Note that I got the character sheet pdf I’m currently using from here.

This was a very fun little project. I enjoy writing apps in Flex. In working on this, I learned about XML schemas, XFDF (a pdf format), and some Perl tricks I’m currently using on my server. I’ll make some posts soon about all that stuff. I wrote some helper Flex apps that I’ll post as well.