Archive for April, 2009

Photo Gallery Maker

Thursday, April 16th, 2009

In my last post, I mentioned I’d be posting tool to create a simple photo gallery. Well, I finished it earlier than I expected. I’d like to talk about the workflow I designed it around, though, before just throwing a link out.

How To Use It

To use my tool, you’ll need the following:

  1. Microsoft .NET framework 3.5 installed. If you don’t have this, you can get it here.
  2. A website (or an http server) where you can post a folder full of files.
  3. Some photos you want to post online.

The general use case is as follows:

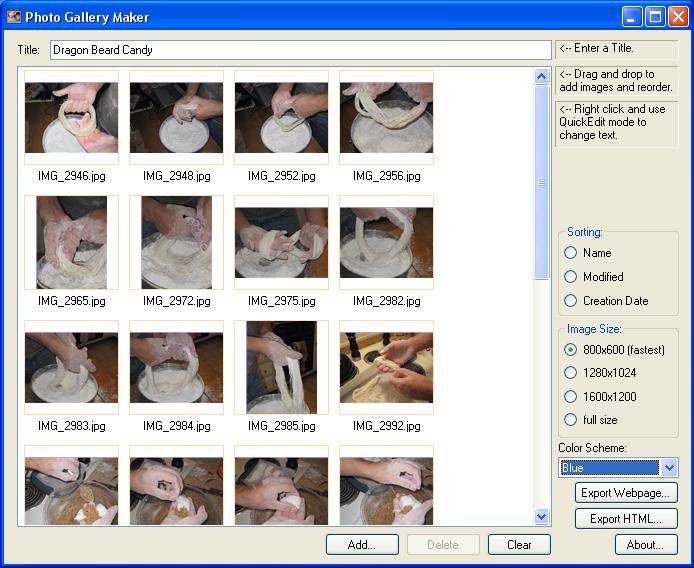
  1. Open up Photo Gallery Maker.
  2. Enter a title for your gallery in the title box.
  3. Drag photos into the large empty listbox. Reorder as necessary using Drag and drop or the sorting options available.
  4. Choose a color scheme.
  5. Click “Export Webpage”, specify an output folder, and click ok. At this point, the app will generate thumbnails and web ready images from your source pictures. It will also copy the necessary CSS and JavaScript files and generate the html for you.
  6. Once generation is complete, copy your destination folder to your
    website. You can then link to the http path of the folder on your website to
    view the gallery.

For example, if I generated the folder “photos” on my computer, and copied it to /www/galleries on my website, then I’d link to http://www.lukerymarz.com/galleries/photos or http://www.lukerymarz.com/galleries/photos/index.html.
Other Features

Now, there are a few extra features I overlooked.

  1. You can double click an image or select it and press enter to change the caption displayed under the thumbnail in the web page. You can alse do this through a right click.
  2. If you’d like a faster way to enter captions, select and image, right click it, and choose “Begin Quickedit Mode”. This will allow you to enter a caption for the current image. When you press enter or tab, the edit focus will move to the next picture and you can enter it’s caption. This will continue until you’ve entered a caption for all the images or clicked the mouse somewhere else.
  3. By default, the full size image will be 800×600. You can choose a few different sizes in the “Image Size” group on the right side of the app. 800X600 is fastest with HighSlide, but sometimes you just want a higher resolution.
  4. If you need to regenerate the html or choose a different color scheme for your gallery, but you don’t want to regenerate all the images, you can use the “Export HTML” button. It will do just that (copy the highslide files, the current color scheme, and generate a new index.html). If you’ve changed the photos in the gallery, use this at your own risk!

CAVEAT: You must have the .NET Framework Version 3.5 installed for this to run. If it’s not installed, you’ll get an error message when you start it up.
Anyways, I found this pretty useful for posting galleries to my website to share with friends.
Photo Gallery Maker version 1.0 can be found here.
Photo Gallery Maker version 1.1 can be found here.  Read more about it here.
Drop me an email at lukerymarz@gmail.com if you have any questions.
A Proper Web Photo Gallery

Wednesday, April 15th, 2009

I don’t know if I’m the only one, but I’ve yet to see a photo gallery in a web page that I like.  The primary problems are:

1.  I don’t want to have to press the back button every time I look at a picture (like facebook, for example).  To that end, the whole gallery (thumbnails and full size images) should be contained on a single page.
2.  I want it to load fast.
3.  I want to have it look nice.
4.  Each picture should have room for a short description.
5.  It should resize to fill the browser window with thumbnails (so you can treat it much like a thumbnails view in Windows Explorer).

Rather than complain about it, though, I thought I’d make something I was satisfied with.  Well, I worked with my girlfriend to put one together (She’s learning HTML and needed a project).  Here’s a sample of how it turned out.
I used Highslide for the fancy javascript transitions.  It’s a really nice kit that plugs in easily.  The only issue I had with it was because I had defined a style for img elements.  The fix was to… not do that, define class that each image could use (for example class=”imgThumb”).
Anyways, this post is a heads up, because I wrote a tool to throw galleries like this together, and I’ll be posting it soon.  More about that when I get there.

Simple XNA Progress Bar

Friday, April 3rd, 2009

I recently needed a dead simple progress bar, where I could give it a display rectangle, min, max, and a value and show me something in game, but couldn’t find anything online. I ended up writing it myself, and thought I’d share what I came up with.

My goal was to create a single file I could drop into a project to allow me to draw a progress bar. All the projects I found involved using a texture as a separate file. I knew from a previous project that you could create that texture in-memory using the Texture2D.SetData() function, and that’s what I did.

I also wanted to provide a double border so I could put the progress bar on top of any background without having its border look invisible. If you’ve ever seen closed captioning disappear because of the background color, you know what I mean. But since not everyone needs a double border, I made sure you could turn it off.

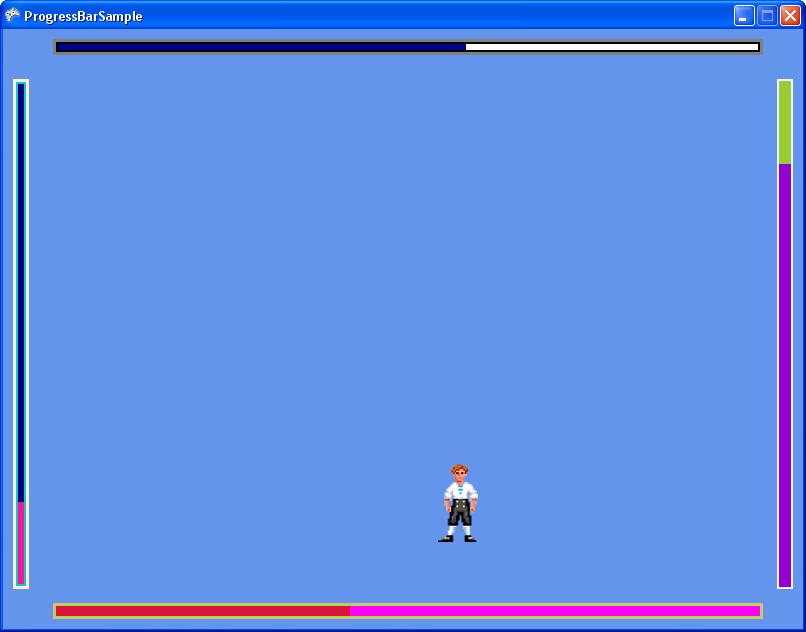
Anyways, here’s and example of what you can do with the progress bar. (download the project for this at the bottom).


So the simple way to get a progress bar into your game is this:

1. Get the source code.

2. Add ProgressBar.cs to your XNA project. Note that I wrote this in 3.0, so make sure you’re on that version or higher.

3. Create an instance of a progress bar in your game1 class;

UI.ProgressBar progressBar;

4. In your LoadContent() function, set it to a new progressBar, and provide the rectangle you want it to lie in. You can also set the minimum, maximum, and value member variables here. The defaults are 0, 100, and 0, respectively.

progressBar = new UI.ProgressBar(this, new Rectangle(10, 10, 300, 16));
progressBar.minimum = 0;
progressBar.maximum= 10000;

5. In your Update() function, update the value of your progress bar if necessary, and then call the progress bar’s Update() function, providing the gameTime (gameTime is not currently used in the progress bar code, though).

progressBar.value = character.health;
progressBar.Update(gameTime);

6. In your Draw() function, call progressBar.Draw(), specifying a spriteBatch. Make sure you’re already called SpriteBatch.Begin() before calling the progress bar Draw() function.

progressBar.Draw(spriteBatch);

And that’s it!

Now, I’ve put quite a few customizable pieces in there. They are all commented in the progress bar code, in the “public members” region.

The one I’d like to talk about is the orientation. You can specify that the progress bar be vertical or horizontal, and in which direction it fill. This is specified at creation time in the ProgressBar constructor. See the orientation member variable for more info.

Here’s a list of the public variables in there now:

float minimum – Minimum value of the progress bar. Default is 0.0f.
float maximum – Maximum value of the progress bar. Default is 100.0f.
float value – Current progress value.

Int32 borderThicknessOuter – Outer border thickness. This is drawn within the bounds of the progress bar. Default is 3.
Int32 borderThicknessInner – Inner border thickness. This is drawn within the bounds of the progress bar. Default is 2.

Color borderColorOuter – Outer border color. Default is Gray.
Color borderColorInner – Inner border color. Default is Black
Color fillColor – Color of the progress section of the bar. Default is Dark Blue.
Color backgroundColor – Color of the background (unfilled) section of the progress bar. Default is White.
Orientation orientation – Gets the orientation of this progress bar. Set at creation time.

Note that you should be careful with the border thickness values. I didn’t add any checking to make sure the border isn’t overcrowding the actual progress bar. You could theoretically have a progress bar that is all border if you set the thicknesses too big.

Ok, so here’s a sample project. Hold space bar if you want to pause.

And here’s the bare ProgressBar.cs file (zipped, of course).